- ▶
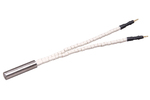
- Heaters/Source
- ▶
- Agilent Heaters and SensorsMass Spectrometry, Scientific Supplies & ManufacturingScientific Instrument Services 5973 Source Heater Tamper Resistant Allen Wrench 5973/5975 Quad Sensor 5985 Source Heater Assembly Agilent Interface Heater Assembly 5971 Interface Heater
- ▶
- LiteratureApplication Notes Adsorbent Resins Guide Mass Spec Tips SDS Sheets FAQ MS Calibration Compound Spectra Manuals MS Links/Labs/ Organizations MS Online Tools Flyers on Products/Services Scientific Supplies Catalog About Us NextAdvance Bullet Blender® Homogenizer Protocols Micro-Mesh® Literature Instrumentation Literature Agilent GC/MS Literature SIS News / E-Mail Newsletter NIST MS Database - Update Notifications

- ▶
- Application NotesNote 103: EPA Method 325B, Novel Thermal Desorption Instrument Modification to Improve Sensitivity Note 102: Identification of Contaminants in Powdered Beverages by Direct Extraction Thermal Desorption GC/MS Note 101: Identification of Contaminants in Powdered Foods by Direct Extraction Thermal Desorption GC/MS Note 100: Volatile and Semi-Volatile Profile Comparison of Whole Versus Cracked Versus Dry Homogenized Barley Grains by Direct Thermal Extraction Note 99: Volatile and Semi-Volatile Profile Comparison of Whole vs. Dry Homogenized Wheat, Rye and Barley Grains by Direct Thermal Extraction GC/MS Note 98: Flavor and Aroma Profiles of Truffle Oils by Thermal Desorption GC/MS Note 97: Flavor Profiles of Imported and Domestic Beers by Purge & Trap Thermal Desorption GC/MS Note 96: Reducing Warping in Mass Spectrometer Filaments, with SISAlloy® Yttria/Rhenium Filaments Note 95: Detection of Explosives on Clothing Material by Direct and AirSampling Thermal Desorption GC/MS Note 94: Detection of Nepetalactone in the Nepeta Cataria Plant by Thermal Desorption GC/MS Note 93: Detection of Benzene in Carbonated Beverages with Purge & Trap Thermal Desorption GC/MS Note 92: Yttria Coated Mass Spectrometer Filaments Note 91: AutoProbe DEP Probe Tip Temperatures Note 90: An Automated MS Direct Probe for use in an Open Access Environment Note 89: Quantitation of Organics via a Mass Spectrometer Automated Direct Probe Note 88: Analysis of Silicone Contaminants on Electronic Components by Thermal Desorption GC-MS Note 87: Design and Development of an Automated Direct Probe for a Mass Spectrometer Note 86: Simulation of a Unique Cylindrical Quadrupole Mass Analyzer Using SIMION 7.0. Note 85: Replacing an Electron Multiplier in the Agilent (HP) 5973 MSD Note 84: Vacuum Pump Exhaust Filters - Charcoal Exhaust Traps Note 83: Vacuum Pump Exhaust Filters - Oil Mist Eliminators Note 82: Vacuum Pump Exhaust Filters Note 81: Rapid Bacterial Chemotaxonomy By DirectProbe/MSD Note 80: Design, Development and Testing of a Microprocessor ControlledAutomated Short Path Thermal Desorption Apparatus Note 79: Volatile Organic Compounds From Electron Beam Cured and Partially Electron Beam Cured Packaging Using Automated Short Path Thermal Desorption Note 78: A New Solution to Eliminate MS Down-Time With No-Tool-Changing of Analytical GC Columns Note 77: The Determination of Volatile Organic Compounds in VacuumSystem Components Note 76: Determination of the Sensitivity of a CRIMS System Note 75: An Apparatus for Sampling Volatile Organics From LivePlant Material Using Short Path Thermal Desorption Note 74: Examination of Source Design in Electrospray-TOF Using SIMION 3D Note 73: The Analysis of Perfumes and their Effect on Indoor Air Pollution Note 72: 1998 Version of the NIST/EPA/NIH Mass Spectral Library, NIST98 Note 71: Flavor Profile Determination of Rice Samples Using Shor tPath Thermal Desorption GC Methods Note 70: Application of SIMION 6.0 To a Study of the Finkelstein Ion Source: Part II Note 69: Application of SIMION 6.0 To a Study of the Finkelstein Ion Source: Part 1 Note 68: Use of a PC Plug-In UV-Vis Spectrometer To Monitor the Plasma Conditions In GC-CRIMS Note 67: Using Chemical Reaction Interface Mass Spectrometry (CRIMS) To Monitor Bacterial Transport In In Situ Bioremediation Note 66: Probe Tip Design For the Optimization of Direct Insertion Probe Performance Note 65: Determination of Ethylene by Adsorbent Trapping and Thermal Desorption - Gas Chromatography Note 64: Comparison of Various GC/MS Techniques For the Analysis of Black Pepper (Piper Nigrum) Note 63: Determination of Volatile and Semi-Volatile Organics in Printer Toners Using Thermal Desorption GC Techniques Note 62: Analysis of Polymer Samples Using a Direct Insertion Probe and EI Ionization Note 61: Analysis of Sugars Via a New DEP Probe Tip For Use With theDirect Probe On the HP5973 MSD Note 60: Programmable Temperature Ramping of Samples Analyzed ViaDirect Thermal Extraction GC/MS Note 59: Computer Modeling of a TOF Reflectron With Gridless Reflector Using SIMION 3D Note 58: Direct Probe Analysis and Identification of Multicomponent Pharmaceutical Samples via Electron Impact MS Note 57: Aroma Profiles of Lavandula species Note 56: Mass Spec Maintenance & Cleaning Utilizing Micro-Mesh® Abrasive Sheets Note 55: Seasonal Variation in Flower Volatiles Note 54: Identification of Volatile Organic Compounds in Office Products Note 53: SIMION 3D v6.0 Ion Optics Simulation Software Note 52: Computer Modeling of Ion Optics in Time-of-Flight mass Spectrometry Using SIMION 3D Note 51: Development and Characterization of a New Chemical Reaction Interface for the Detection of Nonradioisotopically Labeled Analytes Using Mass Spectrometry (CRIMS) Note 50: The Analysis of Multiple Component Drug Samples Using a Direct Probe Interfaced to the HP 5973 MSD Note 49: Analysis of Cocaine Utilizing a New Direct Insertion Probe on a Hewlett Packard 5973 MSD Note 48: Demonstration of Sensitivity Levels For the Detection of Caffeine Using a New Direct Probe and Inlet for the HP 5973 MSD Note 47: The Application Of SIMION 6.0 To Problems In Time-of-Flight Mass Spectrometry Note 46: Delayed Extraction and Laser Desorption: Time-lag Focusing and Beyond Note 45: Application of SIMION 6.0 to Filament Design for Mass Spectrometer Ionization Sources Note 44: The Design Of a New Direct Probe Inlet For a Mass Spectrometer Note 43: Volatile Organic Composition In Blueberries Note 42: The Influence of Pump Oil Purity on Roughing Pumps Note 41: Hydrocarbon Production in Pine by Direct Thermal Extraction Note 40: Comparison of Septa by Direct Thermal Extraction Note 39: Comparison of Sensitivity Of Headspace GC, Purge and Trap Thermal Desorption and Direct Thermal Extraction Techniques For Volatile Organics Note 38: A New Micro Cryo-Trap For Trapping Of Volatiles At the Front Of a GC Capillary Column Note 37: Volatile Organic Emissions from Automobile Tires Note 36: Identification Of Volatile Organic Compounds In a New Automobile Note 35: Volatile Organics Composition of Cranberries Note 34: Selection Of Thermal Desorption and Cryo-Trap Parameters In the Analysis Of Teas Note 33: Changes in Volatile Organic Composition in Milk Over Time Note 32: Selection and Use of Adsorbent Resins for Purge and Trap Thermal Desorption Applications Note 31: Volatile Organic Composition in Several Cultivars of Peaches Note 30: Comparison Of Cooking Oils By Direct Thermal Extraction and Purge and Trap GC/MS Note 29: Analysis Of Volatile Organics In Oil Base Paints By Automated Headspace Sampling and GC Cryo-Focusing Note 28: Analysis Of Volatile Organics In Latex Paints By Automated Headspace Sampling and GC Cryo-Focusing Note 27: Analysis of Volatile Organics In Soils By Automated Headspace GC Note 26: Volatile Organics Present in Recycled Air Aboard a Commercial Airliner Note 25: Flavor and Aroma in Natural Bee Honey Note 24: Selection of GC Guard Columns For Use With the GC Cryo-Trap Note 23: Frangrance Qualities in Colognes Note 22: Comparison Of Volatile Compounds In Latex Paints Note 21: Detection and Identification Of Volatile and Semi-Volatile Organics In Synthetic Polymers Used In Food and Pharmaceutical Packaging Note 20: Using Direct Thermal Desorption to Assess the Potential Pool of Styrene and 4-Phenylcyclohexene In Latex-Backed Carpets Note 19: A New Programmable Cryo-Cooling/Heating Trap for the Cryo-Focusing of Volatiles and Semi-Volatiles at the Head of GC Capillary Columns Note 18: Determination of Volatile Organic Compounds In Mushrooms Note 17: Identification of Volatile Organics in Wines Over Time Note 16: Analysis of Indoor Air and Sources of Indoor Air Contamination by Thermal Desorption Note 14: Identification of Volatiles and Semi-Volatiles In Carbonated Colas Note 13: Identification and Quantification of Semi-Volatiles In Soil Using Direct Thermal Desorption Note 12: Identification of the Volatile and Semi-Volatile Organics In Chewing Gums By Direct Thermal Desorption Note 11: Flavor/Fragrance Profiles of Instant and Ground Coffees By Short Path Thermal Desorption Note 10: Quantification of Naphthalene In a Contaminated Pharmaceutical Product By Short Path Thermal Desorption Note 9: Methodologies For the Quantification Of Purge and Trap Thermal Desorption and Direct Thermal Desorption Analyses Note 8: Detection of Volatile Organic Compounds In Liquids Utilizing the Short Path Thermal Desorption System Note 7: Chemical Residue Analysis of Pharmaceuticals Using The Short Path Thermal Desorption System Note 6: Direct Thermal Analysis of Plastic Food Wraps Using the Short Path Thermal Desorption System Note 5: Direct Thermal Analysis Using the Short Path Thermal Desorption System Note 4: Direct Analysis of Spices and Coffee Note 3: Indoor Air Pollution Note 2: Detection of Arson Accelerants Using Dynamic Headspace with Tenax® Cartridges Thermal Desorption and Cryofocusing Note 1: Determination of Off-Odors and Other Volatile Organics In Food Packaging Films By Direct Thermal Analysis-GC-MS Tech No. "A" Note 14: Elimination of "Memory" Peaks in Thermal Desorption Improving Sensitivity in the H.P. 5971 MSD and Other Mass Spectrometers - Part I of II Improving Sensitivity in the H.P. 5971 MSD and Other Mass Spectrometers- Part II of II Adsorbent Resins Guide Development and Field Tests of an Automated Pyrolysis Insert for Gas Chromatography. Hydrocarbon Production in Pine by Direct Thermal Extraction A New Micro Cryo-Trap for the Trapping of Volatiles at the Front of a GC Capillary (019P) - Comparison of Septa by Direct Thermal Extraction Volatile Organic Composition in Blueberry Identification of Volatile Organic Compounds in Office Products Detection and Indentification of Volatiles in Oil Base Paintsby Headspace GC with On Column Cryo-Trapping Evaluation of Septa Using a Direct Thermal Extraction Technique INFLUENCE OF STORAGE ON BLUEBERRY VOLATILES Selection of Thermal Desorption and Cryo-Trap Parameters in the Analysis of Teas Redesign and Performance of a Diffusion Based Solvent Removal Interface for LC/MS The Design of a New Direct Probe Inlet for a Mass Spectrometer Analytes Using Mass Spectrometry (CRIMS) Application of SIMION 6.0 to Filament Design for Mass Spectrometer Ionization Sources A Student Guide for SIMION Modeling Software Application of SIMION 6.0 to Problems in Time-of-flight Mass Spectrometry Comparison of Sensitivity of Headspace GC, Purge and TrapThermal Desorption and Direct Thermal Extraction Techniques forVolatile Organics The Influence of Pump Oil Purity on Roughing Pumps Analysis of Motor Oils Using Thermal Desorption-Gas Chromatography-Mass Spectrometry IDENTIFICATION OF VOLATILE ORGANIC COMPOUNDS IN PAPER PRODUCTS Computer Modeling of Ion Optics in Time-of-Flight mass Spectrometry using SIMION 3D Seasonal Variation in Flower Volatiles Development of and Automated Microprocessor Controlled Gas chromatograph Fraction Collector / Olfactometer Delayed Extraction and Laser Desorption: Time-lag Focusing and Beyond A New Micro Cryo-Trap for the Trapping of Volatiles at the Front of a GC Column Design of a Microprocessor Controlled Short Path Thermal Desorption Autosampler Computer Modeling of Ion Optics in Time-of-Flight Mass Spectrometry Using SIMION 3D Thermal Desorption Instrumentation for Characterization of Odors and Flavors
- ▶
- Note 14: Elimination of "Memory" Peaks in Thermal Desorption (This Page)
Thermal Desorption System Problem Solving - Technical Bulletin "B"
- March 1995
by John J. Manura,
Scientific Instrument Services, Inc.,
Introduction
In the thermal desorption technique, samples are thermally desorbed from an external thermal desorption device into the GC injection port where the volatile and semi-volatile organics are trapped at the front of the GC column. Since samples are injected and sampled over a long period of time (from 1.0 minute up to 30 minutes), other volatiles which would not normally be observable in a chromatogram will also be trapped at the front of the GC column for subsequent elution as distinct peaks in the final chromatogram. These extraneous chromatographic peaks can originate from carrier gases, the desorption system, septa, contaminated GC injection ports or the GC column itself. These external sources of contamination produce the commonly called "memory" or background peaks that are observable in the chromatogram when blank samples are run as well as interfering peaks when actual thermal desorption samples are being run.
The technique of Short Path Thermal Desorption (SPTD) was designed to eliminate "memory" effects from the desorption of samples and transfer to the GC injection port. The short path design minimizes the sample path length of the sample being analyzed from the glass lined thermal desorption tube and into the GC injection port. The independent sample path consisting of the sample tube and needle is baked out or preconditioned for every sample. If the thermal desorption tubes and transfer line needles are properly prepared and conditioned, this will eliminate any possibility of contamination coming from the desorption system sample path. There are no switching valves, long transfer lines or other devices in the sample path which could be easily contaminated by the samples. However, "memory" peaks can on occasion occur. The source of these peaks is not normally the Short Path Thermal Desorption system, but is usually due to other areas of contamination, in particular the GC injection port. With proper operation of the system and recognition of the sources of these "memory" peaks, their appearance and interference with the analysis can be eliminated or minimized. This article discusses the sources of "memory" or background chromatogram peaks and describes the procedures to eliminate these peaks by proper preparation, cleaning and care of the entire desorption and chromatographic systems.
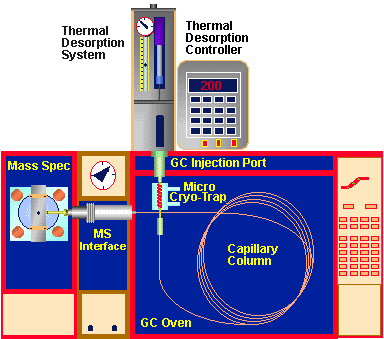
Figure # 1 - Thermal Desorption System Components
Sources of "Memory" Effects
The sources of "memory" or background peaks in the chromatogram can
occur from a number of sources shown in Figure # 1. The following list
outlines the possible sources of these peaks in their logical order of
occurrence from sample preparation to analysis and also the order in which
they should be checked and eliminated. Each of these are subsequently discussed
in the following sections.
Sources of GC Background Peaks
I. Sample Preparation System (i.e. Purge and Trap System)- 1. Desorption Tube
- 2. Adsorbent Resin
- 3. Internal Standard Solvents
- 4. Sample Being Analyzed
- 5. Sampling Containers and Purge Head
- 6. Environmental air or sampling gases
- 1. GC Carrier Gas
- 2. Carrier Gas Hydrocarbon and Oxygen Filters
- 3. Carrier Gas Interconnecting Tubing
- 1. Desorption Carrier Gas
- 2. Connecting Tubing
- 3. Thermal Desorption Connector Tube (tube into which thermal desorption tube attaches)
- 4. Desorption Tube
- 5. Adsorbent Resin
- 6. Sample
- 7. Transfer Line Needle
- 8. Desorption System Temperatures
- 1. Septa
- 2. Injection Port
- 3. Injection Port Liner
- 4. Injection Port Liner Seal ('O' Ring or other seal)
- 5. Injection Port Temperature
- 6. Septum Purge
- 7. Split Vent Lines
- 8. GC Column Inside Injection Port
- 1. Guard Column (type, liquid phase, thickness, & condition)
- 2. Capillary Column (type, liquid phase, thickness, & condition)
- 3. Trap temperatures (both heating and cooling temperature limits)
- 1. Capillary Column
- 2. Temperature Limits
- 3. Transfer Line
Sample Preparation System
Sampling techniques and hardware can contribute to background peaks in the chromatogram. The source of these extraneous peaks can usually be diagnosed by running a blank desorption tube with no sample in the thermal desorption system (see section on running blank samples and Figure # 5). If the background peaks are still present in this blank sample run, then the sampling techniques and hardware are not the source of the problem. If the extraneous peaks disappear in the blank sample, one should next run an analysis through the sample collection system in the absence of the actual sample. For example in a purge and trap type analysis, a conditioned desorption tube with adsorbent resin is run through the entire sample collection process using either no sample or a clean sample (i.e see Figure # 5). This sample is then analyzed for the background peaks. If extraneous peaks appear, they can either be searched out and eliminated or in many cases the user can live with them, since the source of these peaks is known and the resultant peaks do no interfere with the particular analysis. The operator on occasion must eliminate these background peaks when they interfere with the analysis of the sample as described below.
One significant source of background peaks is the desorption tube and adsorbent resin itself. Blank desorption tubes should be thoroughly cleaned, rinsed and silated before being packed with the adsorbent resin. After the desorption tubes are packed with the adsorbent resin, they should be thoroughly conditioned at elevated temperatures with flow through the desorption tube at all times during the conditioning process. Conditioning should include heating the desorption tubes at temperature 50o higher than the temperature at which they will be subjected to during the thermal desorption process. This will assure that all the lower boiling point volatiles will be purged from the resin. They should be held at this temperature for at least 3 to 4 hours. Do not exceed the maximum temperature limit of the adsorbent resin or the resin will begin to decompose. Either high purity nitrogen or helium gas should be used as the purging gas during the conditioning process at flows from 10 to 100 mL/min. For some resins (in particular the Tenax® Resins) care should be taken to avoid air (oxygen) contamination when these resins are at high temperature. Oxygen will oxidize and destroy these resins. After the conditioning process is complete, the tubes should be cooled with gas flow and then capped or sealed until ready for use. With age, the resins may become contaminated with old samples or may begin to decompose. A conditioned thermal desorption tube with adsorbent resin should be routinely analyzed via the thermal desorption technique. A properly conditioned tube and resin should contribute no significant background to the total ion chromatogram. (see the last section of this article and Figure # 5). We routinely replace our resins after about 6 months of continued use as a matter of practice.
Often internal standards are added to the sample being analyzed or to the adsorbent resin bed. The solvents used to prepare these internal standards can be a source of extraneous peaks. Even solvents classified as pure by the manufacturers can contain low concentrations of volatile organics. Running samples of these solvents or the prepared internal standards via the thermal desorption technique will verify the source of these contaminants if present. When preparing internal standards for thermal desorption applications, only high purity solvents should be used. Also prepare standards at concentrations such that the minimum volume of solvent will be added to the sample (i.e 1.0 to 2.0 ul).
Residues on glassware or contaminants from purging hardware or other sample collection glassware and hardware can also be a source of contamination. Care should be used in the cleaning and rinsing of all hardware used for the collection of samples. After cleaning, all glassware and hardware should be baked out in an oven at temperatures higher than they will be used in the sample collection procedures. For example, baking out all hardware in an oven at 125 degrees C will clean this equipment sufficiently for sample collecting at 80 degrees C in most purge and trap applications.
The final source of contamination can be the sampling gases and the environmental air itself. In most cases it is preferable to use high purity gases such as nitrogen, helium or compressed air for purge and trap applications. If these high purity gases are used in conjunction with hydrocarbon traps, this should prove sufficient for most applications. If environmental air must be used for applications such as sampling in the outdoor environment, control samples of the air should be sampled to determine the effect or interference of the volatiles present in the air samples with the samples being analyzed.
Pre GC Sources of "Memory" Effects
The common cause of contamination before the GC is contaminated GC carrier gas or spent gas filters. Only high purity carrier gases such as nitrogen or helium should be used for the GC and thermal desorption system gases. Contamination can also occur when the gas tanks are near empty and care should always be used not to exhaust the GC gas tanks to empty. The hydrocarbon and oxygen filters should be replaced periodically depending on the volume of gas used. It is recommended that these filters be changed at least once per year or more if gas volume use is high. Also be sure to use clean or conditioned connecting tubing in all carrier gas lines to both the GC and desorption system. Precleaned stainless steel or copper lines are probably the best to use. However, due to their flexibility, nylon or PTFE lines are more convenient. The nylon and PTFE carrier gas tubing that we tested proved to be fine and did not produce any extraneous peaks in the chromatogram. The user may wish to check and verify this for his system and connecting tubing.
Desorption System Sources of Contamination
As mentioned earlier, the Short Path Thermal Desorption System was designed to produce no "memory" peaks in the chromatogram due to the unique individual preconditioned sample flow path for each sample analyzed. However, it is possible that some "memory" or background peaks can occur due to the desorption system (Figure # 2). The most obvious cause of these extraneous peaks is due to improper preparation and condition of the thermal desorption tubes as discussed in the Sample Preparation System section. Be sure that both the desorption tube as well as the adsorbent resins have been properly conditioned. Also replace all resins after about 6 months of use. Periodically run conditioned adsorbent resin tubes via the thermal desorption system to verify that the adsorbent resins are clean and not bleeding unwanted volatiles into the GC injection port (Figure # 5).
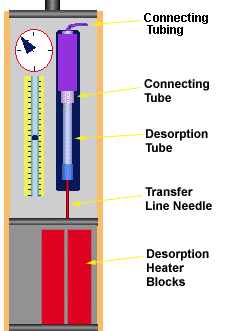
Figure 2 - Thermal Desorption System Components
The biggest mistake that most new users make when using the thermal desorption technique is to desorb the samples at too high a desorption temperature. It is always best to use the lowest thermal desorption temperature needed to achieve the volatilization and purging of the organics of interest from the sample. Higher temperatures only shorten the adsorbent resin life, cause excessive levels of undesired higher boiling compounds to enter the GC injection port, contribute to injection port and septa contamination and cause decomposition of labile compounds. For example, if the purpose of the study is to quantify benzene and toluene in samples purged onto Tenax TA traps (100 milligram of Tenax TA), there is no need to desorb these Tenax traps above 180 degrees C. At this temperature, the benzene and toluene will be desorbed quantitatively from the adsorbent resin trap in a short time with less than 5.0 mL of carrier gas flow through the resin bed. Higher temperatures will not improve the results, and in fact, will probably produce poorer results due to the purging of unwanted volatiles into the GC injection. In another example, when using the Direct Thermal Extraction technique for the direct thermal extraction of volatiles from solid samples placed directly into the thermal desorption tube, it is rarely necessary to thermally extract the samples at temperatures in excess of 150 degrees C. Higher temperatures are not required and will only complicate the chromatogram and may also cause the thermal decomposition of the sample. Always use the lowest temperature needed to achieve the desired chromatographic results with 100% yields for the analytes of interest.
The desorption system transfer line needle can be a source of contamination. Be sure it is conditioned with flow at a temperature at least 50o higher that the desorption system and injection port temperatures. The transfer line needles should be conditioned for at least 30 minutes to 1 hour using high purity carrier gas during the bake out procedure. Occasionally septa or graphite from the needle seal will clog the transfer line needle. The side port needles are recommended for thermal desorption system applications in order to minimize this coring and clogging of the needle. However, some of the septa material or graphite sealing material can still manage to get inside the needle and can actually plug the side port vent hole in the needle. The needles can be checked out and cleaned using a small cleaning wire to clean the needle under a stereo microscope.
The final source of contamination in the desorption system, is the connector tube. This is the tube into which the desorption system screws on the desorption system tower (Figure # 2). This tube can become contaminated if samples happen to backup into this tube. This can occur when solid powder samples are used in the desorption system using the Direct Thermal Extraction Technique and no glass wool is placed on top of the sample. In order to avoid the contamination of the connector tube, clean glass wool should always be placed on top of the solid powder samples when using the Direct Thermal Extraction Technique. This glass wool should be clean and free of volatile contamination. Many users store a small beaker of glass wool in the GC oven or other oven, where it is kept at elevated temperatures (200 to 300 degrees C) to keep it clean. If the connector tube becomes contaminated, it must be removed from the thermal desorption system tower, washed with water or other suitable solvent and then cleaned by purging out at high temperature with continuous flow in the thermal desorption conditioning oven. A temperature of 300 to 350 degrees C for 3 to 4 hours with a high purity gas flow rate of 10 to 100 mL/min through the connector tube will assure that it is thoroughly cleaned.
The flexible tubing that connects the connector tube to the flow controller is not normally a source of contamination. Both nylon and PTFE connecting lines have been used for this purpose with no extraneous peaks resulting from either type of tubing. It has been suggested that nylon tubing could produce some sulfonamide peaks. We do not see these in our system, but to be sure we have recently replaced all nylon tubing inside the Short Path Thermal Desorption System with PTFE tubing. Other components inside the thermal desorption system tower have never produced any observable background peaks. However if the user back flashed solvents or liquid sample into the system, this could be possible. This can be checked by bypassing the entire desorption tower and connecting a supply of clean carrier gas directly to the 1/8" fitting on top of the connector tube. A needle valve can be inserted in this line to control the flow rate. The system can then be operated as described in the section describing the running of blank desorption tubes to determine the source of the background peaks. In most cases this will verify that the contamination is not originating from the desorption system tower. If contamination is determined as originating from the desorption system tower, the user should first bake out the connector tube and it necessary replace the flexible tubing that connects to this connector tubing.
GC Injection Port Sources of "Memory" Peaks
The most likely cause of any "memory" peaks that occurs in the chromatograms originates from the GC injection port. This is due to the change in gas flow patterns in the injection port that occurs during the thermal desorption process and also due to the introduction of hot gas from the sample through the transfer line needle and through the GC septum. These new flow patterns can flush volatiles and contaminants that have been trapped in remote areas of the injection port from previous samples (Figure # 3).
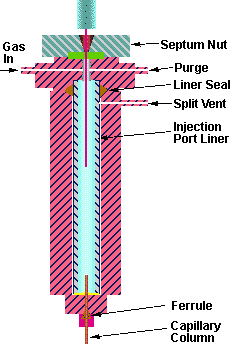
Figure 3 - GC Injection Port Components
The most common source of contaminants in the injection port is the GC septum. Background peaks can originate from both septa bleed as well as from previous samples trapped on the septa. Many less volatile compounds can easily condense on the underside of the septum from which they are easily swept into the GC injection port during thermal desorption with the introduction of the hot carrier gas through the transfer line needle and into the GC injection port. In many models of gas chromatographs such as the Hewlett Packard instruments, the injection port temperature at the underside of the septum can be as much as 100 degrees lower in temperature than the temperature in the center of the GC injection port. The manufacturers have designed this into the system in order to minimize septa bleed in the GC injection port. While this may be helpful in conventional chromatography using liquid injection, it can cause problems with the thermal desorption technique due to the cooler temperatures at the top of the injection port. The cooler temperature at the underside of the septum can result in condensation of samples on the underside of the septum as well as contamination of the top portion of the injection port and its connecting gas lines. In addition when the transfer line needle is injected into the GC septum which is cooler than the middle section of the injection port, higher boiling components can be trapped in the transfer line needle if it is too cool. This can be minimized by using a higher injection port temperature or a new design of injection port liner which provides for better thermal conductivity of heat to the top of the injection port and to the transfer line needle.
The problem of septa bleed can be minimized by using low bleed high temperature septa. We have found the Supelco Thermogreen septa to be the optimum type of septa for use with thermal desorption. We have found that they produce the lowest amount of bleed even when used at temperatures up to 300 degrees C. Septa bleed can also be minimized by using a septum purge at all times, even when using the splitless technique. A septum purge of 0.5 to 3.0 mL/min will result in the loss of some sample (in effect a sample splitting effect), but this small splitting (1:1 to 1:2) of the sample is preferable to the results obtained when not using a septum purge. In addition, sample splitting (when this technique is permitted) will also minimize the effect of septum bleed. The split method also has the additional feature of minimizing the occurrence of water plugs during the thermal desorption of samples with relatively high water content.
The standard GC injection port liners can contribute to poor heat transfer to the sample and low temperatures near the GC septum area of the injection port. Conventional injection port liners are glass and have either a 2.0 or 4.0 mm I.D. This large I.D. is necessary to permit the volatilization of the liquid sample into the gas phase due to the large increase in sample size volume which occurs during this phase transition. However this large dead volume is not required in the thermal desorption process, since the sample is introduced into the injection port already in the gas phase. In addition the large inner diameter provides poor heat conductivity to the transfer line needle and to the sample being volatilized. The septum area of the injection port area can remain quite cool as compared to the temperature of the lower portion of the injection port due to this poor heat conductivity through the injection port liner. Therefore the septum is easily contaminated with samples which can carry over into the next sample for analysis or higher boiling semi-volatiles can become trapped in the transfer line needle. The contamination of the underside of the septa can be minimized with the use of injection port liners specifically designed for thermal desorption applications (Figure # 4). These new liners consist of a glass lined stainless steel liner with a narrow I.D. These liners provide for a smaller dead volume inside the GC injection port, better transfer of heat to the desorption system transfer line needle and higher temperatures at the septum end of the injection port. The result is easier cleaning of the injection port, minimal contamination at the underside of the GC septum and the analysis of higher molecular weight semi-volatiles as compared to conventional injection port liners. These glass lined stainless steel injection port liners proved quite valuable for the analysis of semi-volatile PNA's (Polynuclear Aromatics). Using conventional glass injection port liners, we were able to only desorb and analyze twelve of the sixteen PNA's specified in EPA methods for the PNA's in soil even though the injection port was set to 350 °C. The last four higher boiling PNA's did not purge through the transfer line needle. When the injection port liner was replaced with one of the new style glass lined stainless steel liners, we were able to detect, identify and quantify all sixteen of the PNA's specified by EPA.
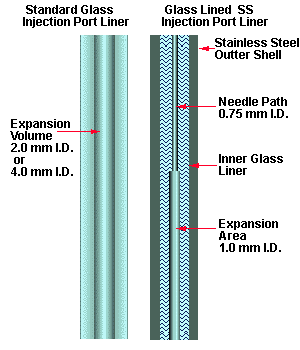
Fig. 4 - Injection Port Liner Construction
The standard O Rings used to form the seals for the injection port liners can also cause foreign peaks in the chromatogram. These O Rings are normally made of Viton® or Silicone rubber which easily bleed at temperatures above 250 degrees C. This problem can be minimized by using lower injection port temperatures. However the lower temperatures will compound the septum contamination problem discussed above and will reduce the boiling point range of the compounds which can be thermally desorbed onto the GC column. The best solution is to use the new graphitized Vespel injection port liner seals that are available for sealing the injection port liners. Pure Vespel could also be used but may be too hard, requiring too much torque to tighten and may break the injection port liners. The graphitized Vespel seals are soft enough to form a good seal and are usable to temperatures up to 400 degrees C with no bleed into the GC injection port.
The injection port should be thoroughly cleaned when the thermal desorption system is first installed as discussed in the "Injection Port Cleaning" section of this article. It is important to bake the injection port out at least 50 degrees higher in temperature than the temperature which it will be operated in the thermal desorption process. This will assure that it is clean and no lower boiling compounds will be purged from the septa or from the injection port during the thermal desorption or extraction process.
The injection port should be operated at the lowest temperature possible. This temperature must be at least the same temperature or higher than the thermal desorption temperature. The temperature must be high enough to keep the extracted volatiles in the gas phase and prevent condensation of the higher boilers on the underside of the GC septum. However there is a tradeoff. The higher the injection port temperature the greater the degree of septum bleed, column bleed and the extraction of other contaminants into the GC injection port for subsequent trapping at the front of the GC column.
The length of the GC capillary column or guard column that enters the injection port from the GC oven side should be kept to a minimum. This is particularly important if high injection port temperatures or thick film guard columns are used. High temperatures can increase the purging of the liquid phase from the front end of the column, a condition which is enhanced with the use of thick film columns. By minimizing the amount of the column which enters the injection port this column bleed can be minimized. Also the use of thin film columns are preferable to thick film columns or guard columns.
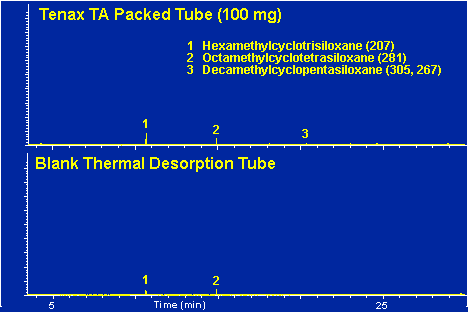
Figure # 5 - Background Peaks in Tenax TA Packed Tube Vs Blank Desorption Tube. Desorption Tube at 250 degrees C for 5.0 minutes.
Cryo-Trap and GC Oven Effects on "Memory" Peaks
For the trapping of volatiles at the front of the GC column in the thermal desorption process, either the entire GC column oven is cooled or preferably a Cryo-Trap is used at the front end of the GC column (Figure # 1). Whichever technique is used, the effect of high temperatures can shorten the life of the capillary or guard column. At high temperatures, the liquid phase will rapidly bleed from the column and the column can be easily destroyed. This decomposition or deterioration of the liquid phase at the front of the guard column is accelerated if the column is exposed to oxygen while at high temperatures. Therefore care should be used to avoid the introduction of air into the front of the column when it is at high temperatures. For example, GC septa should only be changed when the GC column oven is at room temperature. In the thermal desorption process this front end column bleed is trapped at the front of the column inside the Cryo-Trap and is subsequently released to produce distinct GC peaks. This is normally recognized as the characteristic siloxane peaks indicated in Figure # 5, # 6, # 7, and # 8. For optimum operation, the columns should be operated at the lowest temperatures at which the desired chromatography results can be obtained. Do not automatically run the capillary column to 300 degrees C because that is the temperature to which it is rated. In most thermal desorption applications, samples are rarely desorbed at temperatures over 250 degrees C, therefore it should not be necessary to temperature program the GC over 260 degrees C. By operating the Cryo-Trap temperature as well as the GC oven temperature at these lower temperature levels, well below the maximum rated temperature of the column, the life and health of the columns will be assured. If large siloxane peaks appear in the chromatogram they are probably due to the degradation of the liquid phase on the guard column at the front of the GC. The guard column should be periodically replaced when these peaks become excessive.
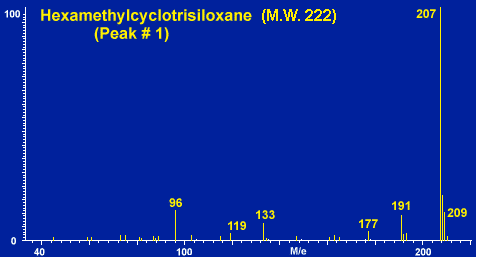
Figure # 6 - Background Peak # 1 -Hexamethylcyclotrisiloxane

Figure # 7 - Background Peak # 3 - Octamethylcyclotetrasiloxane
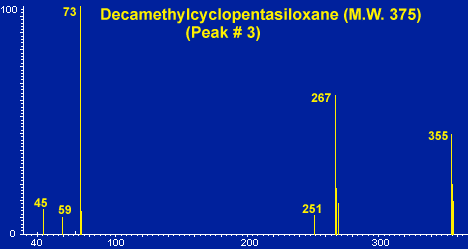
Figure # 8 - Background Peak # 3 - Decamethylcyclopentasiloxane
Likewise, when selecting GC columns, use capillary columns with liquid phases that are rated for temperatures well above the temperatures required for the analysis. The selection of phase coating thickness is a tradeoff that the user must take into account. The thicker phase coatings provide for a larger dynamic range of sample loadings which are preferable in the trapping section of the column inside the Cryo-Trap. The thicker phase coatings also permit the trapping of lower volatile compounds in the Cryo-Trap. However these thicker film columns provide for higher column bleed. Megabore guard columns, in the trapping section of the GC oven or Cryo-Trap, minimize the formation of ice plugs due to their larger surface area. A favorable solution is to use a reasonably thick phase megabore guard column in the Cryo-Trap portion of the GC oven and then use a thinner phase coating capillary column in the GC sample oven. For example use a short megabore column (100 cm in length) with a DB5 phase coating thickness of 1.0 to 3.0 micron in the GC Cryo-Trap. A good overall general capillary column is the 0.25 mm I.D. x 0.25 micron film thickness by 30 to 60 meter DB5-MS (J&W). This special low bleed column was designed especially for mass spec applications making it also an ideal column for thermal desorption applications. This combination provides good trapping for even the very light volatiles such as acetone at a Cryo-Trap temperature of -70 degrees C and the good resolution of the resulting compounds of interest. SGE type low dead volume stainless steel unions are the preferred union for the joining of the two columns. Press type fitting have not proven reliable under the extreme temperature variations from sub ambient to high temperatures normally used with the thermal desorption techniques. If the type of analysis being conducted is strictly for semi-volatiles (such as the PNA's) it is preferable to use a low phase coating thickness or no phase at all in the Cryo-Trap guard columns, in order that these semi-volatiles can be easily removed from the trapping section of the columns. Otherwise excessive temperatures would be required to remove these high boilers from the thick film guard columns. These higher temperatures would also result in the removal of the siloxane liquid phase from the guard column.
Preparing the GC and Thermal Desorption System for Minimal Background
When the thermal desorption system is first installed on the GC several steps should be taken to assure the elimination or at least the minimization of background or "memory" peaks in the chromatogram. Since the GC was probably used previously for regular syringe type liquid injections, the injection port can be assumed to be contaminated as discussed in the injection port discussion above. The following procedures should be followed to clean the injection port and initialize the system for thermal desorption applications.
1. Turn off the GC injection port heater and column oven heater and allow to cool
2. Remove the GC column from the GC injection port inside the GC oven and close off the ends of the column with old septa.
3. Remove the GC septum nut and septum.
4. Remove the Injection port liner and injection port liner seal
5. Wash out the injection port using swabs soaked in acetone or methanol solvent. Wash until no residues remain. Be sure no particles of dirt or fibers from the cotton swab remain in the injection port.
6. Replace injection port liner with a new clean glass lined stainless steel injection port liner designed for your make and model of GC. Use new graphitized Vespel® injection port liner seal.
7. Install a new Supelco Thermogreen septa and the GC septum nut. Do NOT install the column.
8. Turn on the GC carrier gas to at least 30 mL/min. Be sure that septum purge and split vent lines and valves are open.
9. Heat the injection port to 350 degrees C. At this stage the carrier gas flow should be left on at the high flow, all purge and split vent lines are left open and the column in NOT installed.
10. Attach the Thermal Desorption System to the GC injection port.
11. Attach a clean unpacked and conditioned thermal desorption tube and transfer line needle to the thermal desorption system.
12. Heat the thermal desorption system heater blocks to 350 degrees C.
13. Turn on the desorption system carrier gas (push Gas button) and adjust the flow to at least 60 mL/min.
14. Inject the thermal desorption tube and needle into the GC injection port ( push Inject button).
15. Close the thermal desorption heater blocks around the desorption tube (push Desorb button)
(the previous desorption system steps 13, 14 & 15 must be done in the manual mode).
16. Allow the system to flow condition for at least 30 minutes (60 minutes is preferable).
The GC column is NOT installed during this operation.
The above conditioning step is purging the GC injection port with hot gas around all parts of the injection port at the highest temperature possible. No GC column is installed during this conditioning. High flows of the hot gasses are being purged through the injection port and into the GC oven, out the septum purge vent and also out the split vent lines. Areas of the GC injection port which would not normally be cleaned are thoroughly cleaned and purged during this high temperature flow conditioning step. The net result is a thorough conditioning and cleaning of the entire injection port. It is important that the thermal desorption steps be performed in the manual mode so as not to close the split vent lines or septum purge lines.
The next series of steps include the cooling down of the GC and thermal desorption system parts to their maximum usable temperatures and reconditioning the entire system with the GC column installed.
18. Uninject the thermal desorption tube and needle from the GC injection port.
19. Cool the GC injection port to 280 degrees C. (or the maximum temperature that you plan to use)
20. Cool the Desorption system heater blocks to 280 degrees C. (or the maximum temperature at which samples will be desorbed).
21 Install a new GC guard column and the capillary columns that are to be utilized for the analysis.
22. Heat the GC oven to 260 degrees C or to the maximum temperature at which it will normally be operated.
23. Inject the thermal desorption tube and needle (still at high flow) into the GC injection port
24. Close the desorption blocks around the desorption tube.
25. Allow the system to set and condition for at least 30 minutes (60 minutes is preferable)
The above steps will thoroughly clean and condition the injection port and front of the GC column at the maximum temperatures at which the system will normally be operated for the analysis of your samples. If samples are to be desorbed at temperatures above 250 degrees C or if the GC is to be run above 260 degrees C, the temperatures in steps 19, 20 and 22 should be altered accordingly. It is recommended that both the GC injection port temperature and the thermal desorption temperature be set to at least 30 degrees higher in temperature than the temperature at which they will normally be operated during this cleaning procedure. Use care not to heat the injection port higher than the GC column limit, since the GC column is attached to the injection port and degradation of the column could occur at the front end if the injection port is heated too hot.
After the system cleaning is complete, the systems should be cooled down in order to prepare the system for the analysis of the samples.
26. Open the desorption system heater blocks
27. Uninject the desorption tube and allow to cool
28. Lower the desorption flow to the standard operating flow
29. Reset the Desorption System heater blocks to the standard operating temperature
30. Set the Injection port temperatures and GC oven temperatures to their required conditions.
After the above steps have been carried out, the GC and thermal desorption system should be ready for the analysis of samples. To assure a clean injection port as well as the proper operation of the system, a blank sample is normally run as will be described later (Figure # 5).
Daily Maintenance
A simplified injection port cleaning and conditioning should be performed every morning before any samples are analyzed or whenever the GC injection port has been overloaded with sample. This simplified cleaning only requires about 20 minutes and will assure a clean operating system which should be confirmed daily by running a blank sample.
1. Attach a clean unpacked conditioned thermal desorption tube and transfer line needle to the thermal desorption system.
2. Heat the thermal desorption system heater blocks to 280 degrees C.
3. Turn on the desorption system carrier gas flow to at least 60 mL/min.(manual mode).
4. Inject the thermal desorption tube and needle into the GC injection port (manual mode)
5. Close the desorption heater blocks around the desorption tube (manual mode)
6. Heat the GC oven to 260 degrees C, split mode, septum purge open
7. GC injection port should be set to 280 degrees C with normal carrier gas flow rates.
8. Allow the system to set and condition for at least 10 minutes (20 minutes is preferable)
The above steps will thoroughly clean and condition the injection port and front of the GC column at the maximum temperatures at which the system will normally be operated for the analysis of your samples. If samples are to be desorbed at temperatures above 250 degrees C or if the GC is to be run above 260 degrees C, the temperatures in steps 19, 20 and 22 should be altered accordingly. It is recommended that both the GC injection port temperature and the thermal desorption temperature be set to at least 30 degrees higher in temperature than the temperature at which they will normally be operated during this cleaning procedure. Use care not to heat the injection port higher than the GC column limit, since the GC column is attached to the injection port and degradation of the column could occur at the front end if the injection port is heated too hot.
After the system cleaning is complete, the systems should be cooled down in order to prepare the system for the analysis of the samples.
9. Open the desorption system heater blocks
10. Uninject the desorption tube and allow to cool
11. Lower the desorption system flow rate to the standard operating flow
12. Reset the Desorption System heater blocks to the standard operating temperature
13. Set the Injection port temperatures and GC oven temperatures to their required conditions.
After the above steps have been carried out, the GC and thermal desorption system should be ready for the analysis of samples. To assure a clean injection port as well as the proper operation of the system, a blank sample is normally run as will be described below (Figure #5).
Running a Thermal Desorption System Blank
At least once per day, normally after one of the system cleaning and conditioning steps described above has been carried out a system blank should be run. For this system checking, either a blank clean and conditioned desorption tube or a packed conditioned thermal desorption tube should be used depending on the techniques that will be used for subsequent testing. For a first time start up, a blank empty tube should be used. Later a desorption tube packed with the adsorbent resin of choice should be run to verify the proper conditioning and preparation of the adsorbent resin tubes and to assure that no bleed or extraneous peaks are originating from the adsorbent resin.
1. Attach a clean unpacked thermal desorption tube and transfer line needle to the thermal desorption system.
2. Heat the thermal desorption system heater blocks to 250 degrees C.
3. Set the desorption system carrier gas flow to 5.0 mL/min. (splitless mode)
4. Set the gas time to 30 seconds, the inject time to 1.0 minute and the desorption time to 5.0 minutes.
5. Set the Cryo-Trap and GC conditions to the methods that will be used for the sample analysis
6. Cool the Cryo-Trap and GC oven to the initial temperature and conditions
7. Start the Desorption process and subsequent GC run
8. When finished print out the total ion chromatogram.
In a normal GC run of the blank desorption tube only a few minor peaks should be apparent as shown in Figure # 5 bottom. These peaks usually originate from either septum bleed or from column bleed from the front of the guard column. These peaks, commonly referred to as the siloxane peaks, are the three small peaks apparent in the chromatogram. These siloxane peaks originate from both the GC septa as well as the liquid phase of the capillary or guard column. In a normal GC run these peaks would not appear as distinct GC peaks. They appear as normal GC background or noise at a constant low level. However in the thermal desorption technique, these compounds are trapped in the Cryo-Trap section of the guard column during the thermal desorption step and are subsequently chromatographed as distinct GC peaks. Mass Spectra of these siloxane peaks are shown in Figures # 6, # 7 and # 8. The major peaks in these mas spectra correspond to the background peaks normally seen in a standard GC run, i.e. 207, 281, 267 and 355. These background peaks have long been associated as resulting from the silicone used in the manufacture of GC septa, and in deed we have thermally desorbed silicone polymers to verify this as a common source of these peaks. These peaks can be minimized by using high quality preconditioned GC septa. We have found that the Supelco Thermogreen to be the best septa available for thermal desorption applications due to their low bleed. However the siloxane peaks can also originate form the siloxane coatings of the GC capillary columns. One must use care not to overheat the GC column or pre column in order to minimize background due to liquid phase decomposition.
The higher the desorption temperature and the injection port temperature
the higher that these peaks will appear in the total ion chromatogram.
The background peaks can be minimized by use of the septum purge, use of
the split technique, and operating the desorption system and injection
port at the lowest temperatures needed to complete the analysis. High levels
of these siloxane peaks indicate that the septum is bad or the GC guard
column is degrading.
Table I - Thermal Desorption and GC Conditions for Chromatograms (Figures 4 - 7)
Thermal Desorption - Desorb blank or packed thermal desorption tube at 250 degrees for 5.0 minutes
Desorption Flow rate 5.0 mL/min, gas time 30 seconds injection time 1.0 minutes, desorption time 5.0 minutes
GC Injection Port - Injection port temperature 250 degrees C, splittless mode, septum purge 1.0 mL/min
Cryo-Trap - Initial cooling temperature -70 degrees C for 5.0 minute desorption time heat to 230 degrees C when desorption complete, Cryo-Trap Guard column - megabore deactivated fused silica column
GC Conditions - H.P. 5890 Series II GC column 0.32 mm x 60 meter, .25 um phase thickness DB5-MS (J&W) temperature program 30 degrees C to 260 degrees C at 8 degrees /min, flow 1.8 mL/min He
Detector - H.P. Engine Mass Spectrometer, E.I. mode, 70 eV, scan
mass 35 to 350.
When a conditioned thermal desorption tube packed with Tenax TA resin is analyzed in the same manner as the blank tube a similar chromatogram is obtained as shown in Figure # 5 (top). This same chromatogram and its 10 times scale expansion view is shown in Figure # 9. Note that in addition to the three siloxane peaks several additional minor peaks are apparent in the expanded graph of the Tenax tube. These peaks are not present in the blank unpacked thermal desorption tube. For all the results of the packed Tenax TA tubes, the desorption tubes were packed with 100 milligrams of Tenax TA and then flow conditioned for 4.0 hours at 300 degrees C in the S.I.S. flow conditioning oven.
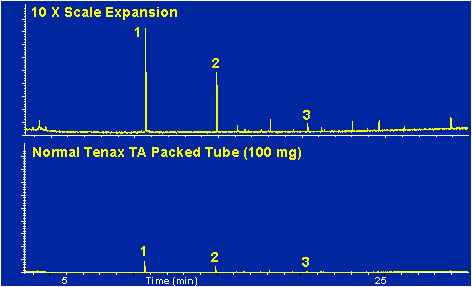
Figure # 9 - Background Peaks of Packed Thermal Desorption Tube, Desorb at 250 degrees C for 5.0 minutes.
The intensity of background peaks from the adsorbent resin is a function of the desorption temperature. A comparison of the background peaks as a function of desorption temperature for a desorption tube packed with Tenax TA is shown in Figure # 10. The packed Tenax desorption tubes were thermally desorbed at temperatures from 200 to 300 degrees C in 20 degree increments. This chart demonstrates that the lower the desorption temperature, the lower the background peaks in the chromatogram. These background peaks are originating from both the adsorbent resin and from the GC injection port. As is apparent in the charts, the relative intensities of the siloxane peaks increase as the temperature increases. This is due to the hot carrier gas passing through the desorption tube and flushing the underside of the GC septa. The higher the temperature, the more of these siloxanes that will be purged off the under side of the septa. The other minor peaks originate from the Tenax adsorbent resin. If the higher desorption temperatures were required, these peaks could be minimized by conditioning the Tenax at a slightly higher temperature. We prefer not to condition the Tenax at higher temperatures, because it shortens the life of the Tenax as you repeatedly expose it to temperatures near its maximum rated value.
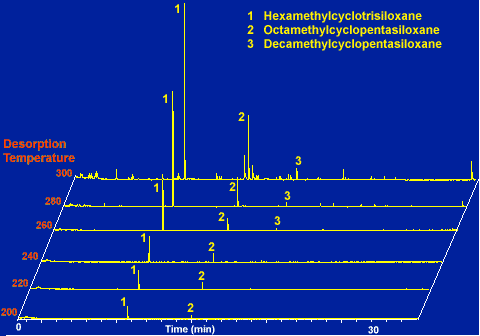
Figure # 10 - Background as a Function of Desorption Temperature for a Tenax TA Desorption Tube
All of the background peaks exhibited in the previous chromatograms are quite weak in comparison to the normal sample sizes that are analyzed via the thermal desorption technique. These weak peaks are only of concern when very low levels of samples are being analyzed (< 1.0 ng) or when these peaks co-elute with compounds of interest. Figure # 11 demonstrates the relative height of a 4.0 ng sample of naphthalene thermally desorbed from the Tenax TA trap at 250 degrees C. As can be seen from the resulting chromatogram the levels of the background peaks are quite weak in comparison to this small sample.
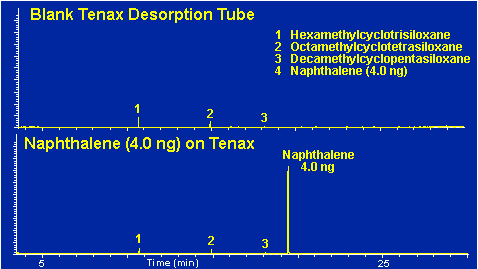
Figure # 11 -- Contribution of Thermal Desorption Background Peaks to a 4.0 ng Naphthalene Sample.
Figure # 12 demonstrates the improvement in a typical background by cleaning the injection port utilizing the methods described above.

Figure # 12 - Chromatogram background before and after cleaning and conditioning the GC injection port.
Conclusion
As can be seen from the previous chromatograms, the background peaks in the thermal desorption techniques can be minimized or reduced to almost zero with the proper preparation, cleaning, conditioning and care of the thermal desorption system, GC injection port and GC columns. The possible sources of "memory" or background peaks have been discussed in this article along with procedures to find the cause and to eliminate these background peaks in the chromatograms. When the thermal desorption system is first installed onto the gas chromatograph the "Preparing the GC and Thermal Desorption System for Minimal Background" procedures described above should be followed to initialize the system. In addition daily maintenance of the system as described above should also be performed at least once per day as described in the "Daily Maintenance" procedures. Every day at least one blank or packed conditioned thermal desorption tube should be analyzed under the standard operating conditions in order to verify the cleanliness of the system and to assure that background peaks are not interfering with the analysis of the samples.