- ▶
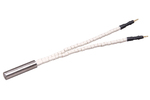
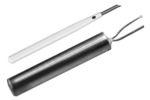
- Heaters/Source
- ▶
- Agilent Heaters and SensorsMass Spectrometry, Scientific Supplies & ManufacturingScientific Instrument Services 5973 Source Heater Tamper Resistant Allen Wrench 5973/5975 Quad Sensor 5985 Source Heater Assembly Agilent Interface Heater Assembly 5971 Interface Heater
- ▶
- MS Instrument Cleaning Supplies
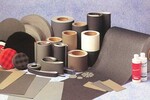
- Lab/CleanMicro-Mesh® (Fine Cushioned Abrasive) Aluminum Oxide Cleaning Abrasive Fiberglass Cleaning Brushes Swabs and Applicators Nylon and Latex Gloves Cleaning Wipes SIS MS Source Cleaning Kits Dust-Off® Hurricane Canless Air System Wheaton Bottles Wheaton Vials Wheaton Closures Sterile Vials - Bottle, Stopper, and Cap - All Together Certified Sterile Kimble Chase Clear Serum Vials Soil Sampling Kits Crimpers and Decappers Temperature Measurement & Recording Devices Bullet Blender® Homogenizer The SW 110 Multi-Purpose Spot Welder New Era Syringe Pump Systems Ohaus MB Series Moisture Analyzers Celestron® Handheld Digital Microscope (HDM) Checkit® Pipette Accuracy Test Greenwood Lab Supplies Next Advance Lab Products Catalog Page G1

- ▶
- Micro-Mesh®Sheets Rolls Discs Pads Nail Files Tufbuf Micro-Gloss Tape Belts Sanding Swabs Polishing Tool Quick-Shine Buffers Kits - Plastic (power) Kits - Plastic (hand) Kits - Craftsman, Wood, Metal Kits - Automotive & Headlight Restoration Kits Kits - Aircraft Window Reference - Grit Size Reference - MSDS Sheets, Brochures, Instructions, Kits Print Catalog - Micro-Mesh Catalog Page A63 Catalog Page A64 Catalog Page A65 Catalog Page A66 Catalog Page G3 Catalog Page G4 Catalog Page G5 Catalog Page G6 Catalog Page G7 Catalog Page G8
- LiteratureApplication Notes Adsorbent Resins Guide Mass Spec Tips SDS Sheets FAQ MS Calibration Compound Spectra Manuals MS Links/Labs/ Organizations MS Online Tools Flyers on Products/Services Scientific Supplies Catalog About Us NextAdvance Bullet Blender® Homogenizer Protocols Micro-Mesh® Literature Instrumentation Literature Agilent GC/MS Literature SIS News / E-Mail Newsletter NIST MS Database - Update Notifications

- ▶
- Reference - MSDS Sheets, Brochures, Instructions, KitsMicro-Mesh Regular - Description of Micro-Mesh Regular Micro-Mesh MX - Description of Micro-Mesh MX for Metal Finishing Benefits of Micro-Mesh - What Makes Micro-Mesh So Special Ergonomic Benefits of Micro-Mesh - Human Factors, Engineering and Micro-Mesh TufBuf Polishing Pads - Polishing and Buffing Pads Guidelines for Acrylic Finishing Guideline for Making Belts with Micro-Mesh Micro-Gloss Instructions Metal Finishing with Micro-Mesh Random Orbital sanding with Micro-Mesh Solid Surface Finishing with Micro-Mesh Urethane Coating rectification Procedures Wood Finishing Procedures with Micro-Mesh Micro-Mesh Grit Size Conversion Chart Aquarium Restorer Kit Instructions Belt Finishing with Micro-Mesh Burn Kit Instructions Clear Seas Acrylic Kit Instructions Clear Seas Vinyl Kit Instructions Craft Kit Instructions Heavy Damage Removal Kit Instructions Light Damage Removal Kit Instructions KR-70 Acrylic Restoration Kit Instructions Maintenance Kit Instructions Micro-Mesh Anti-Static Cream Final Finish Micro-Finish Micro-Gloss Micro-Gloss # 5 TufBuf Polishing Pad
- ▶
- Light Damage Removal Kit Instructions (This Page)
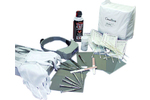
Finishing Procedures for the Light Damage Removal Kit
A. TOOLS REQUIRED:
- (1) Random orbital sander.
- 1) Angle Polisher, (Rated at approx. 2500 RPM), with 4.75 inch diameter
Hook Back-Up pad. - (1) Compressed Air - 120 pounds per square inch.
- (1) Spray bottle - approximately 10 ounce capacity. (For clean water).
B. LIST OF CONTENTS:
- (2) 1500 Micro-Mesh 5" Discs
- (2) 2400 Micro-Mesh 5" Discs
- (2) 3600 Micro-Mesh 5" Discs
- (1) Back-Up Pad, 4.75 inch diameter
- (1) TufBuf polishing pad
- (1) White sponge pad
- (8 ounce) Micro-Gloss
- (8 ounce) Anti-Static Cream
- (2) Flannel Cloths
- (1) Kit Parts Reorder Form
- (1) Instructions
C. PREPARING FOR THE BEST RESULTS:
1. To avoid scratching plastic surfaces, do not wear watches, rings, or bracelets. Long fingernails should be covered with gloves.
2. Always keep the work surface and restoral materials clean as contamination can cause scratches.
3. Work with adequate light. Set a bright light on the side opposite your restoral side. For better viewing on non-transparent surfaces, place the light at an angle.
4. Read the restoral instructions carefully and review the kit contents before starting.
D. BEGINNING THE PROCESS:
1. Spray the surface with water. Using the random orbital sander with soft back-up pad provided, begin with the 1500 Micro-Mesh. Cover the entire surface of the transparency with long, sweeping motions. At regular intervals, change the directions of sweep to perpendicular of the previous motion. The damage is removed when all that can be seen is the pattern left by the Micro-Mesh. This process should take approximately 3-5 minutes per square foot. If after this amount of time the damage remains, it may be necessary to remove it using our Heavy Damage Removal Kit.
2. Change to 2400 Micro-Mesh and repeat to remove the 1500 scratches. Always be sure to keep the surface wet when working with the Micro-Mesh discs.
3. Change to 3600 Micro-Mesh and repeat the above process to remove the 2400 scratches.
4. Attach the TufBuf polishing pad to the right angle polisher. Wet the surface with water. Apply approximately 1 tablespoon of Micro-Gloss and buff for 2-4 minutes.
5. Attach the white foam sponge pad and repeat Step 4. Rinse the surface off with water. Wipe clean with a dry flannel cloth. All fine scratches should be gone. If not, repeat the buffing process.
6. Apply Anti-Static sparingly to the surface, using a clean, dry, flannel cloth. Polish surface by hand to remove the static charge that has built up during the process. Clean sponge, TufBuf, and flannel cloths with mild detergent and rinse for future use.
E. BENEFITS OF MAINTAINING TRANSPARENCIES:
Pilots and passengers alike need and appreciate the clear and undistorted view that a well maintained transparency provides. Comfort, enjoyment, but more importantly - SAFETY, are all requirements today! The smallest of scratches can lead to crazing. By keeping transparencies smooth and optically clear, through regular maintenance, crazing can be avoided.