- ▶
- Heaters/Source
- ▶
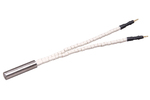
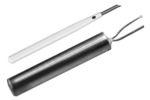
- Agilent Heaters and SensorsMass Spectrometry, Scientific Supplies & ManufacturingScientific Instrument Services 5973 Source Heater Tamper Resistant Allen Wrench 5973/5975 Quad Sensor 5985 Source Heater Assembly Agilent Interface Heater Assembly 5971 Interface Heater
- ▶
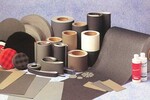
- MS Instrument Cleaning Supplies
- Lab/CleanMicro-Mesh® (Fine Cushioned Abrasive) Aluminum Oxide Cleaning Abrasive Fiberglass Cleaning Brushes Swabs and Applicators Nylon and Latex Gloves Cleaning Wipes SIS MS Source Cleaning Kits Dust-Off® Hurricane Canless Air System Wheaton Bottles Wheaton Vials Wheaton Closures Sterile Vials - Bottle, Stopper, and Cap - All Together Certified Sterile Kimble Chase Clear Serum Vials Soil Sampling Kits Crimpers and Decappers Temperature Measurement & Recording Devices Bullet Blender® Homogenizer The SW 110 Multi-Purpose Spot Welder New Era Syringe Pump Systems Ohaus MB Series Moisture Analyzers Celestron® Handheld Digital Microscope (HDM) Checkit® Pipette Accuracy Test Greenwood Lab Supplies Next Advance Lab Products Catalog Page G1

- ▶
- Micro-Mesh®Sheets Rolls Discs Pads Nail Files Tufbuf Micro-Gloss Tape Belts Sanding Swabs Polishing Tool Quick-Shine Buffers Kits - Plastic (power) Kits - Plastic (hand) Kits - Craftsman, Wood, Metal Kits - Automotive & Headlight Restoration Kits Kits - Aircraft Window Reference - Grit Size Reference - MSDS Sheets, Brochures, Instructions, Kits Print Catalog - Micro-Mesh Catalog Page A63 Catalog Page A64 Catalog Page A65 Catalog Page A66 Catalog Page G3 Catalog Page G4 Catalog Page G5 Catalog Page G6 Catalog Page G7 Catalog Page G8
- ▶
- Kits - Automotive & Headlight Restoration Kits
- ▶
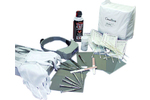
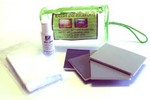
- Clearcoat Paint Restore Kit (This Page)

Description
Made to be used by hand, this kit is engineered to remove superficial damage, scuffs and surface scratches and restore painted surfaces to their original luster. Damage that penetrates through to the prime coat, color coat, or bare metal will require an application of paint prior to using this kit. You should apply a coat of wax to protect after. Damage that penetrates through the clear coat into the primer/color coat and bare metal will require an application of paint prior to using this kit.
Content:
- 1 - 2" x 3" Soft Touch Pad, 2400/3600 Micro-Mesh™
- 1 - 2" x 3" Soft Touch Pad, 4000/6000 Micro-Mesh™
- 1 - 2" x 3" Soft Touch Pad, 8000/12000 Micro-Mesh™
- 1 - 1 oz. Bottle, Micro-Gloss
- 1 - Flannel Sheet
- 1 - Set of Instructions
Instructions
Paint-Clear Coat Restoration Kit
This kit has been engineered to remove superficial damage and restore surfaces to their original luster.
Damage which penetrates through to the prime base coat or bare metal, such as a chip, will require an application of paint prior to use of this kit. We recommend that you use exact replacement paint for best results. Avoid any areas of striping or decorative decals.
List of Contents:
- 1, 2” x 3” Color-coded Soft Touch® Pad: 2400(Black)/3600(Brown)
- 1, 2” x 3” Color-coded Soft Touch® Pad: 4000(Teal)/6000(Lt. Purple)
- 1, 2” x 3” Color-coded Soft Touch® Pad: 8000(Blue)/12000(Grey)
- 1, 1 oz. Bottle Micro-Gloss® liquid glosser
- 1, 11” X 12” Cotton flannel wipe
Step 1 - Determine Type and Extent of Damage and Starting Point
- Deep Scratches - Easily felt with the fingertip. Begin with the 2400 pad.
- Minor Scratches - Readily detected with fingernail. Begin with the 3600 or 4000 pad.
- Hairline Scratches & Light Scuffs - Light scratches and hazing - Begin with the 6000 or 8000 pad.
- Very Fine Scratches - Usually caused by improper cleaning methods. Begin with the 8000 or 12000 pad.
- Stains/Discolorations – Start with the 8000 pad, finish with the 12000 and Micro-Gloss.
Step 2 - Damage Removal
1. FILLING. This step can be omitted if scratches are in the finish only. Damage that penetrates through to the prime base coat, or to bare metal, will require the application of touch up paint (not included) prior to the use of this kit. The paint acts as a filler and is easily smoothed out using the abrasive pads. For best results, we recommend that you use the exact paint match recommended for your vehicle. Always let the paint thoroughly dry for at least 24 to 48 hours prior to use of the kit.
2. BLENDING. Begin by using the coarser grit recommended in the above information. The lower the grit number the more aggressive the result. The Soft Touch® pads can be used wet or dry, but best results are obtained if used wet. This will also help keep the surface cool and the pads free of abraded particles. Clean fresh water is an excellent lubricant and coolant. Water may be sprayed or misted onto the pad’s surface using a spray bottle, or dip the pads into fresh water occasionally during use. A drop of mild dish detergent can be added to water for lubrication.
DO NOT SAND IN A CIRCULAR PATTERN. Sand using a straight-line pattern. With each successive grit, change the direction of your sanding pattern 90 degrees (i.e.vertically, then horizontally.). To save time and unnecessary work, spot sanding in a localized area surrounding the damage is recommended. Use firm pressure and sand evenly over the entire area until the damage has been removed completely. This damage removal step is CRITICAL! Unsatisfactory results will result if left incomplete. After 3-5 minutes, check your progress. If it seems the damage is not being removed at an acceptable rate, begin again using a coarser grade of Soft Touch Pad®. In the case of deep scratches the time needed to remove the damage will be longer since more material will need to be removed. Note: If voids remain in and around the area where touch up paint has been applied, use another coat of paint to fill the void. DO NOT attempt to sand away voids or damage will result. Repeat this process until all voids are completely filled and the paint is blended smooth. The object is to fill, blend, and smooth the toup up paint, and then to polish out the surrounding area. DO NOT over sand or damage to the surrounding area will result. The first pad will leave minor scuffing to the surrounding area. Each successive grit will remove the previous scratch pattern until a scuff free finish results after use of the last pad.
3. Proceed using the next FINER Soft Touch Pad®, changing the direction of your sanding pattern 90 degrees from the previous step. Pads range from coarse to fine: 2400, 3600, 4000, 6000, 8000, and 12000. Continue sanding until the previous sanding pattern has been completely removed. Inspect your work. If water is being used, dry the surface completely before inspecting. The use of 100% cotton flannel is recommended. Avoid synthetics and paper towels that can scratch painted surfaces.
4. Continue the process using the above instructions and progressively finer Soft Touch Pads. Finish using the 12000 pad.
5. Clean the surface by flushing with water or blowing with air.
Step Two - Surface Restoral
1. Once the surface has been sufficiently cleaned, flush with water. Using the enclosed flannel cloth, wipe the surface dry. Dampen the flannel cloth with water and apply a dime size drop of Micro-Gloss® to the flannel.
2. Using firm pressure and working in a straight-line pattern, rub the Micro-Gloss briskly over the entire prepared area allowing a slight over-lap for color blending and shining. Continue for 1-2 minutes until the Micro-Gloss® has almost disappeared. Water may be added to extend the working time.
3. Rinse the surface with water and wipe clean. Dry with a soft cloth and apply a coat of premium wax for final shine and lasting protection.
Note: Rinse thoroughly removing all abraded particles from the flannel and Micro-Mesh Soft Touch Pads®, dry and store for future use. Keep the Micro-Gloss® from freezing temperatures.
IMPORTANT NOTICE: Micro-Surface Finishing Products, Inc. (“Micro”) MAKES NO WARRANTIES, EXPRESS OR IMPLIED, INCLUDING, BUT NOT LIMITED TO, ANY IMPLIED WARRANTIES OF MERCHANTABILITY OR FITNESS FOR A PARTICULAR PURPOSE. User is responsible for determining whether this product is fit for a particular purpose and suitable for user’s method of application.
LIMITATION OF REMEDIES AND LIABILITY: If this product is proved to be defective, THE EXCLUSIVE REMEDY, AT MICRO’S OPTION, SHALL BE TO REFUND THE PURCHASE PRICE OF OR TO REPAIR OR REPLACE THE DEFECTIVE PRODUCT. Micro shall not otherwise be liable for loss or damages, whether direct, indirect, special, incidental, or consequential, regardless of the legal theory asserted, including negligence, warranty or strict liability.
1/2004 PRK Instructions
HOW TO ACHIEVE THE BEST FINISH USING MICRO-MESH® Soft Touch Pads
The polishing of surfaces can be very exacting. Success or failure depends on the technician’s knowledge of, and his ability to follow, an established sequence.
Pressure Should be Light. Remember the cushioned abrasive cuts with the abrasive crystal tips. The sharp cutting edges are floating on a resilient matrix. Extreme pressure pushes the tips back into the matrix rendering them ineffective and resulting in surface smearing, burning, and possible orange peel and distortion.
KEEP EVERYTHING YOU USE CLEAN. This includes equipment, sandpapers, MICRO-MESH®, and all wiping materials. A minor scratch here or there is not a crisis situation, but picking up a piece of metal or other contaminate from the top of a work area can be a disaster. Watch where you set things down.
Acceptable Cleaning and Maintenance Materials:
100 % cotton flannel
Genuine chamois, not synthetic or imitation
Biodegradable liquid detergent
MICRO-MESH® Anti-Static cream
MICRO-GLOSS® polish and cleaner
WinBRIGHT Spray plastic cleaner
Bug Blaster Spray bug remover
Unacceptable Cleaning and Maintenance Materials:
Paper towels or other paper products
Shop towels or synthetic fiber fabrics
Commercial window cleaners
Any product containing ammonia or solvents or alcohol
Clean the Work Surface between each step, especially in cracks and crevices. Flush surface several times with clean water to remove dust and dirt before touching it with anything. Clean abraded particles from the work piece by rinsing and then dry and inspect.
Inspect the Work Piece between steps with a bright light to ensure you are removing the previous scratch pattern before continuing on.
Keep the Abrasives Clean. Keeping them clean will improve performance and extend life.
To Avoid Scratching the Surface, do not wear watches, rings, or bracelets. Long fingernails should be covered with gloves.
For Superficial and Light Surface Damage, use MICRO-GLOSS® liquid abrasive following the directions on the label of the bottle.
For Deep Damage and Crazing, you will be required to remove the damage firstly with sandpaper and then restore the surface to its original state using MICRO-MESH®. After damage is removed by using sandpaper in a succession of steps from coarse to fine, ie: 120 grit, 220 grit, 400 grit wet/dry, then begin the MICROMESH® series with MICRO-MESH® 1500 and proceed through the series to 12000 or until the original surface is matched.
Use a Straight-line Crossing Pattern. Do not use a circular pattern except in the final hand buffing or antistatic operations.
Using MICRO-MESH® with Water and a few drops of detergent will generally result in a less effort having to be used and a slightly better finish. Only use enough water to provide lubricity to the surface, but not so much that poor contact is made with the work piece.
DO NOT wear out one of the meshes by trying to make it do too much work on your first step. If your estimated damage is not readily removed, go immediately to the next coarser mesh. Removing the initial damage with the sandpaper series will take up 85% of the restoral time. The MICRO-MESH series and the buffing procedures will take as little as 15% of the time. DO NOT skip steps in either the sandpaper or the MICRO-MESH® series.
Work an area slightly larger with each step to blend. Working one small area on a highly curved section could create flat spots or distortion.
IMPORTANT NOTICE: Micro-Surface Finishing Products, Inc. (“Micro”) MAKES NO WARRANTIES, EXPRESS OR IMPLIED, INCLUDING, BUT NOT LIMITED TO, ANY IMPLIED WARRANTIES OF MERCHANTABILITY OR FITNESS FOR A PARTICULAR PURPOSE. User is responsible for determining whether this product is fit for a particular purpose and suitable for user’s method of application.
LIMITATION OF REMEDIES AND LIABILITY: If this product is proved to be defective, THE EXCLUSIVE REMEDY, AT MICRO’S OPTION, SHALL BE TO REFUND THE PURCHASE PRICE OF OR TO REPAIR OR REPLACE THE DEFECTIVE PRODUCT. Micro shall not otherwise be liable for loss or damages, whether direct, indirect, special, incidental, or consequential, regardless of the legal theory asserted, including negligence, warranty or strict liabilities.
| Part No. | Description | Quantity In Stock |
Price EA |
Order |
|---|---|---|---|---|
| 3KPAINT | AUTOMOTIVE RESTORE KIT | DISCONTINUED | --- | --- |
| * Call for availability. | ||||
|
|
||||
 Micro-Mesh® Headlight Kits
 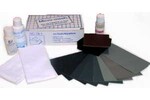 Micro-Mesh® NC-78-1 Acrylic Restoral Kit